Create a virtual guided course walk
A course walk with added audio and/or video can help riders to be better prepared, promote good riding, engage spectators and promote your coaching skills or sponsors. And it's free to create and publish! The easiest way to add audio and video is in the CrossCountry App on your phone or tablet but if you have recorded voice memos separately or have professionally produced film or drone footage, you can also add these in the app or the Toolkit
Some examples
Course designer Mike Etherington-Smith gives a fascinating insight into the course for spectators Adelaide 5* guided course walk
British Eventing Master Coach Warren Lamperd created guided course walks for BE 90, 100 and Novice courses at Larkhill, England
Australian Coach Marcia Williamson gave invaluable tips to riders in her Denman 80cm guided course walk
Course designer Helen West talked explained how she balanced the challenge of a final pre run for the Kentucky 5 star while keeping the course fair for those perhaps doing their first 4* at Stable View, South Carolina
- Make sure you are in a quiet place. Background noise can spoil the effect
- Portrait photos look best if you are just taking a single photo of a fence. Video is best landscape.
- For recording video on course we strongly advise the use of a wireless lapel microphone such as the Comica to suppress wind noise. Make sure you buy one compatible with your phone.
Step by Step
We are assuming you have the course on our phone. If not, record the course yourself or ask the organisers to share the download link with you
Adding audio & Video
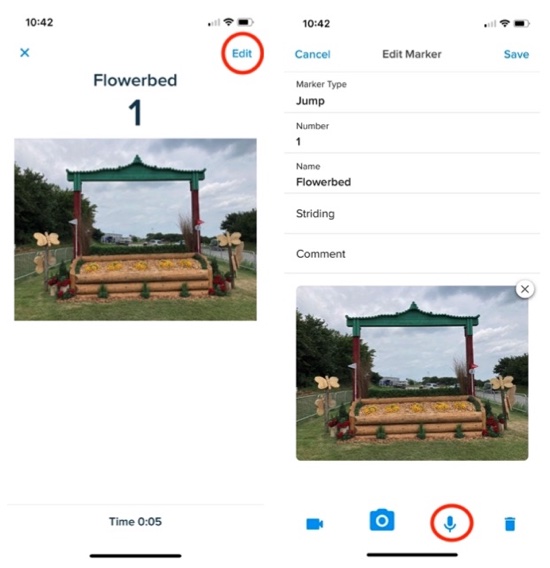
- Tap the fence to open it and tap Edit
- Make sure you know where the microphone is (usually at the bottom of your phone) and speak into it for clear recording
- Tap the voice memo icon to start recording
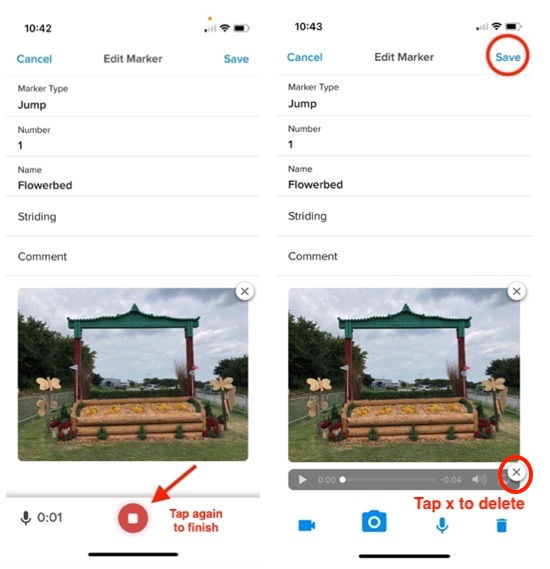
- Tap again to stop
- Don't worry if you make a mistake, simply record again and delete the voice memos you don't want
- At the same time you can add photos, video, fence names, striding or text comments
- Check the sound level of your audio or video before going to the next fence, just in case you need to rerecord. Do this by scrolling through the photos and tapping the voice memo icon
- Tap Save to continue to the next Fence
- Tap the video icon to take a video - eg. of a rider or coach striding out a combination. If they speak clearly as they walk and it is not windy, you may be able to capture what they say but for best results use a lapel microphone.
- if you have recorded voice memos separately or have professionally produced film or drone footage, you can also add these in the app or in the Cross Country Toolkit
When you have finished
- upload the course again. You can create a duplicate rather than overwriting the original if you wish
- Make the course public
- Make sure you and the organiser publicise the course walk following our tips